Security in Obscurity
A thought by Jeff Stein
Constructing a Website with AWS: Getting Started and S3 Configuration (Part 1)
The costs associated with having a website has gone down significantly, June 2019
There are a variety of ways to build a website. From fully managed solutions to content management systems (CMS) such as Joomla or WordPress, the options at your disposal to make your content available on the internet are vast and the costs associated with having a website has gone down significantly. For my blog I choose to leverage the feature set provided by AWS to build a static site that is very cost effective and has low overhead in terms of infrastructure to maintain, as well as, the surface area required to secure the website. This thought focuses on getting started with your AWS account and building out your S3 design to host your website and is part of a two part series on constructing a static site using AWS which includes:
Getting Started and S3 Configuration
Beyond S3
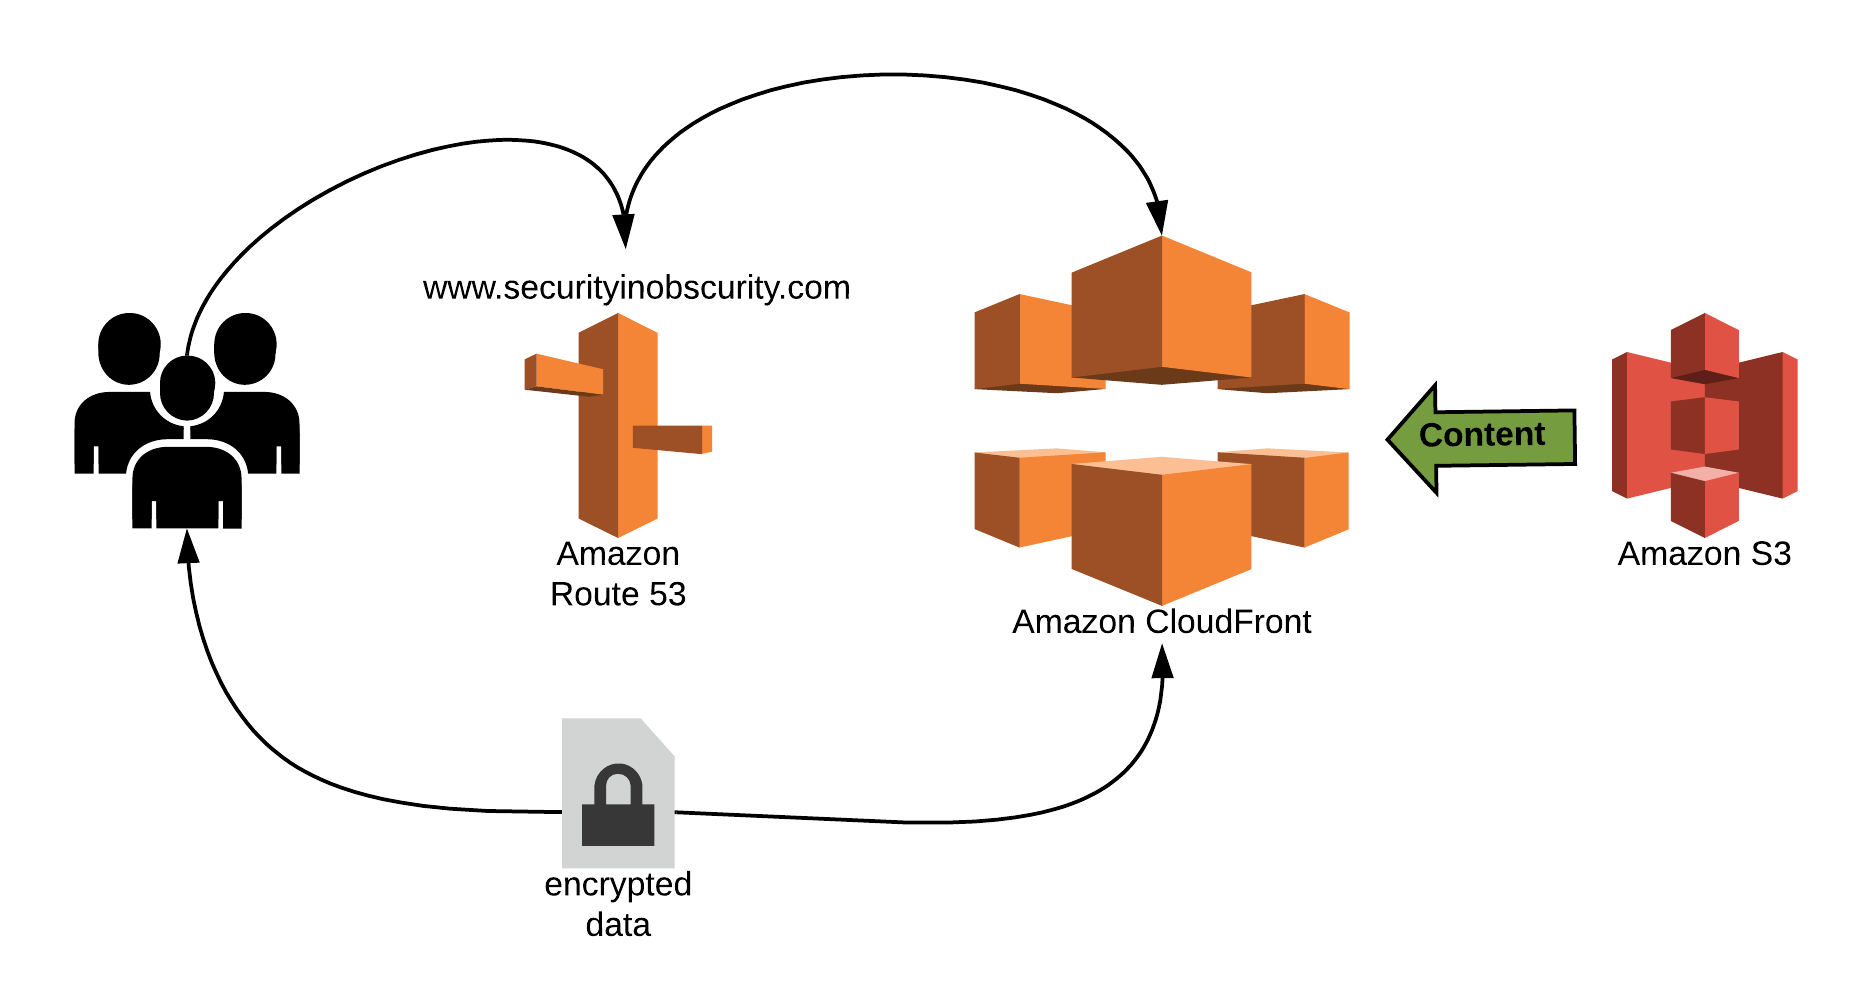
The core of my site is leveraging static HTML pages hosted on S3 buckets. The content is then distributed using a CDN utilizing Amazon CloudFront so that it is highly available. Below is a diagram illustrating how the concepts function.
Getting Started
To get started you will want to create an account with AWS. There are tons of best practices on creating your account with AWS however I recommend that you leverage a long, complex password and pair that with MFA. Additionally you will want to use your root account as sparingly as possible. Create additional accounts, leveraging Amazon's built in IAM feature set to delegate activities for items such as S3 (Storage) and Route 53 (DNS). Again leverage complex passwords and MFA for these accounts. By utilizing separate accounts for your tasks you will reduce the risk that your root account can be compromised and any compromise against the specialized accounts will be minimized because you are taking advantage of least privilege by delegating the duties away from your root account.
S3 Configuration
S3 will house all of your static content such as HTML files, CSS files and pictures. You will want to start by creating the parent directory (bucket) to store all of the website files. When naming the folder, know that the name will have to be unique across all S3 buckets in Amazon [1]. Technically the folder name will also be the name of your website (don't think too much on this just yet as I will discuss more on this later in part two of this series) so choose your directory name wisely.
Configuring file uploads
Once you have created your bucket you will want to upload all of your files to S3 under your root folder. I recommend batching your uploads and uploading all files of the same type at the same time during your initial transfers. This is because one of the steps during upload will be to tag the files with metadata. This metadata will be important as you will want to define each file type with a content-type meta tag in S3. For example, all HTML files should be tagged as text/html and CSS files should be tagged as text/css and jpeg pictures should be tagged as image/jpeg, etc. One nice benefit to leveraging S3 buckets is as you upload new versions of the files in the bucket the meta tagging already configured will stick so frontloading the work will save you time when updating your files.
In addition to meta tagging there are a few other configurations you will want to set during uploading of files. You will want to choose your S3 storage option. For most cases this should be the Standard option. Additionally since your S3 bucket(s) will be used to host a website you will want to ensure that the files being uploaded are configured to be publicly available.
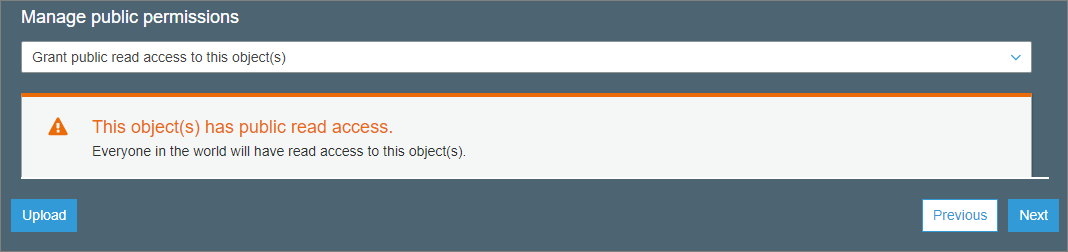
Turning this on during upload is important because the default option when uploading files is that they will not be shared publicly which means that like meta tagging, if you do not configure it properly with your batch upload you will need to go to each file to set the configuration.
Configuring your bucket for sharing
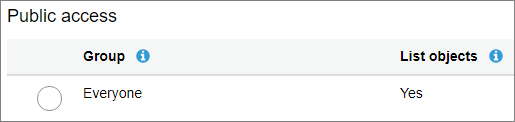
Even though you have configured your individual files in your bucket to be accessed publicly, you will still need to make some configuration changes to the S3 bucket in order to access the files on the internet. First select the bucket you created and navigate to the Access Control List section under Permissions. Since you will be using this bucket as a location to host your website you will want to be sure that you added public access for the Everyone group to "List Objects."
Next you will navigate to the Bucket Policy and add a policy to allow public reading of objects [2].
A sample of the code is displayed below:
Code
"Statement": [
{
"Sid": "PublicReadForGetBucketObjects",
"Effect": "Allow",
"Principal": "*",
"Action": "s3:GetObject",
"Resource": "arn:aws:s3:::[bucket name]/*"
}
Under the permissions tab of your S3 bucket you will need to configure a cross-origin resource sharing (CORS) policy which defines a way for client web applications that are loaded in one domain to interact with resources in a different domain [3].
The code inserted into your CORS policy should ensure the bucket has GET access from all domains.
A sample of the code to contain in the CORS configuration is below:
Code
<CORSRule>
<AllowedOrigin>*</AllowedOrigin>
<AllowedMethod>GET</AllowedMethod>
</CORSRule>
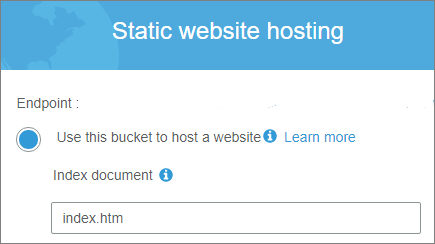
The final step to configuring your bucket for sharing is to navigate to the Static web hosting section under Properties. Select the radio button to "Use this bucket to host a website." Input the html file name of your index document and save your configuration.
Leveraging S3 to host your static web content is very cost effective and simple to maintain. The functionality of S3 allows you to turn a simple IAAS solution into a PAAS solution for hosting a website. In the process, S3 takes out many of the normal dependencies and infrastructure required of a web hosting solution. No IIS is required nor Apache to make the solution work. Reducing these infrastructure dependencies for which you need to maintain therefore helps to reduce your attack surface areas, that a malicious actor may take advantage of on your site.
Resources Consulted
[1] Bucket Restrictions and Limitations (n.d.). Retrieved from Article Link.
[2] Example: Setting up a Static Website (n.d.). Retrieved from Article Link.
[3] Cross-Origin Resource Sharing (CORS) (n.d.). Retrieved from Article Link.
Tags
Security Vulnerabilities IDS/IPS Malware Ethical Hacking Policies PowerShell Python Splunk Cloud Script PKI Firewall Router Vulnerability Management